
October 14, 2026
Install a Reverse Osmosis Drain Line Correctly
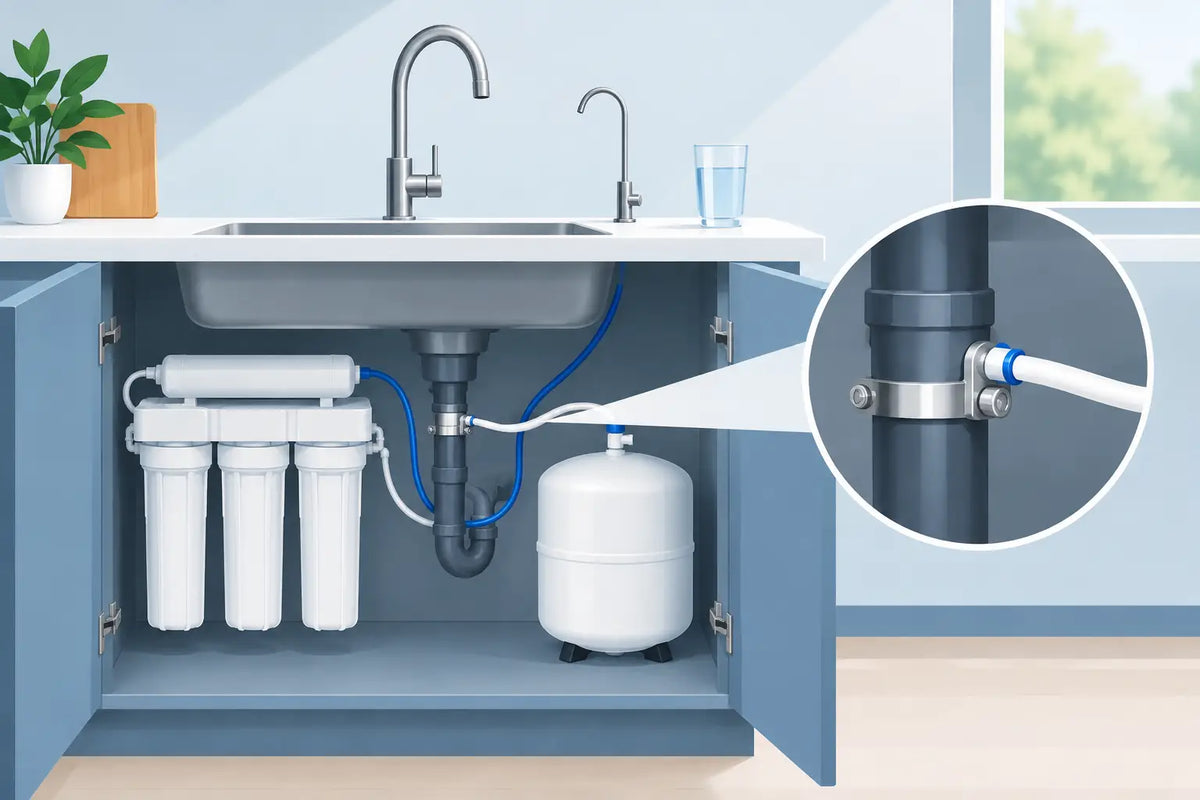
A reverse osmosis system can make a major difference in the taste and quality of your drinking water, but its drain connection deserves the same care as the filters and membrane. When you install a reverse osmosis drain line correctly, the system can safely send concentrated wastewater to the household drain without leaks, odors, backups, or damage beneath the sink.
This is a manageable project for many homeowners, provided the plumbing is accessible and you follow your specific system manual. The right installation protects your cabinet, supports dependable RO performance, and keeps the drain connection sanitary.
Why the RO Drain Line Matters
A reverse osmosis membrane separates dissolved contaminants from the water you want to drink. It needs a continuous stream of water across the membrane to do that job. The purified portion goes to the storage tank or tankless unit, while the concentrated reject water must leave through the drain line.
That drain line is not an optional accessory. A pinched tube, poor drain saddle connection, or improperly placed hole can cause wastewater to back up into the system. At best, that can reduce production. At worst, it can create a hidden leak or allow drain odors to enter the cabinet.
Most residential RO systems use small polyethylene tubing connected to a drain saddle mounted on the sink drainpipe. Some systems use an air-gap faucet, which creates a physical break between the RO system and the drain. Others use a non-air-gap design. The correct routing and fittings depend on which design you have, so the manufacturer instructions always take priority over a general installation method.
Before You Install a Reverse Osmosis Drain Line
Start by identifying the drainpipe under your kitchen or bar sink. The drain saddle should normally attach to the straight, horizontal section of pipe above the P-trap. This location allows reject water to flow into the drain before the trap while avoiding the curved section where drilling and sealing are less reliable.
Do not install the saddle on the vertical tailpiece directly beneath the sink strainer, on the P-trap itself, or on a section of pipe that is cracked, corroded, or difficult to reach. If your sink has a garbage disposal, dishwasher connection, unusual plumbing arrangement, or very limited cabinet space, consider having a plumber assess the best connection point. A small change in layout can prevent recurring drainage problems.
Gather the system manual and confirm the tube size before beginning. Many systems use 1/4-inch tubing for the drain, but air-gap faucets may use larger tubing on the faucet-to-drain side. Avoid assuming that every RO kit is configured the same way.
For a typical drain-saddle installation, you will usually need:
- A drill and the drill bit specified by the RO manufacturer
- A Phillips screwdriver or nut driver for the saddle clamps
- A marker, tape measure, and clean rag
- A utility knife or tubing cutter for a clean, square tubing cut
- Safety glasses and a small container or towel for any water in the trap area
Check whether your faucet uses an air gap
An air-gap faucet is designed to prevent wastewater from siphoning backward toward the RO system. It typically has multiple tubes connected beneath the faucet. One line carries reject water from the RO unit to the faucet air gap, and another carries that water from the air gap to the drain saddle.
That second line may be larger than standard RO tubing and must maintain a downhill path to the drain. If it sags, kinks, or runs uphill, you may hear gurgling from the faucet or see water spill from the air-gap opening during production. Non-air-gap systems have a simpler direct drain tube, but they still require secure routing and a properly sealed drain connection.
How to Install a Reverse Osmosis Drain Line
Choose a clean spot on the horizontal drainpipe above the P-trap, leaving enough room to tighten the drain saddle and insert the tubing. Hold the saddle in place and mark the drill location through its opening. The saddle hole and the hole drilled into the pipe must align closely. Misalignment restricts flow and may make the connection leak.
Drill the opening slowly, using the bit size specified for your drain saddle. For common residential saddles, the opening is often about 1/4 inch, but confirm this in your installation guide. Drill only through the near side of the pipe. You do not want to puncture the far wall.
Wipe away plastic or metal shavings from around the hole. Place the foam gasket, if included, on the saddle half that sits against the pipe. Position both halves around the drainpipe and tighten the screws evenly. The saddle should feel firm and sealed, but overtightening can crack plastic drainpipe or distort the saddle gasket.
Next, cut the drain tube straight across. A clean square end makes a better seal in a push-connect fitting. Push the tube fully into the drain saddle fitting. If your system uses a compression fitting instead, slide the nut and ferrule onto the tube in the order directed by the manufacturer, then tighten only enough to secure it.
Route the tubing back to the RO unit or air-gap faucet without sharp bends. Use gentle curves, and keep the line away from hot dishwasher components, sharp cabinet edges, and areas where stored cleaning supplies can crush it. For an air-gap faucet, route both drain lines exactly as labeled in the manual. Mixing the connections can cause noisy operation or overflow at the faucet.
Test for flow and leaks
Once the tubing is connected, restore water to the RO system and allow it to begin producing water. New systems may run for several hours while the tank fills, so you may not see a heavy drain flow immediately. Check the saddle connection, tubing ends, and cabinet floor several times during the first production cycle.
A slow, steady discharge is normal while an RO system is making water. Constant water flow long after the tank is full may point to a different issue, such as incorrect tank pressure, a malfunctioning shutoff valve, or a membrane problem. The drain line itself may be clear, but the system should still be inspected if it never stops sending water to drain.
Common Drain Line Problems and What They Mean
Water on the cabinet floor is often caused by tubing that was not pushed fully into a quick-connect fitting, a loose compression nut, or a saddle that was mounted over an uneven section of pipe. Dry the area completely, run the system, and trace the moisture to its source rather than tightening every fitting at random.
Gurgling or dripping from an air-gap faucet usually means the faucet-to-drain tube is restricted. Check for kinks, low spots, and debris at the saddle opening. If the drain saddle was installed slightly off-center, the pipe opening may be partly blocked by the saddle body.
A sewer odor under the sink can indicate a loose drain connection or an air-gap setup that is not routed properly. The P-trap should retain water and block sewer gases, while the RO drain connection should remain sealed at the pipe. Do not use tape as a permanent fix for a leaking saddle or damaged tube. Replace the affected fitting or tubing section.
If wastewater backs up through the air-gap faucet, stop the system and address the restriction before using it again. The issue may be a clogged drain saddle, a blocked household drain, or an incorrect hose route. For homes with slow drains or older plumbing, a plumbing professional can confirm that the sink drain has adequate flow before the RO system is placed back in service.
Know When to Ask for Help
Most under-sink RO drain connections are straightforward, but some installations call for expert support. That includes homes with cast iron plumbing, tightly packed disposal assemblies, nonstandard drain sizes, recurring drain clogs, or commercial RO equipment with higher wastewater flow. Commercial and light industrial systems may need larger drain lines, air gaps, floor drains, or code-specific plumbing protection.
Pure Water Guys can help match the system configuration to your home, water concerns, and available space before installation begins. The goal is not simply to fit a system under the sink. It is to create a dependable setup that delivers clean drinking water without adding avoidable maintenance problems.
A dry cabinet, quiet faucet, and steady drain flow are the signs of a drain line installed with care. Check the connection again after the first few days of use, then let your RO system do what it was designed to do: provide better water for the people who rely on it.